
秋、どこか寂しい季節、、、でもコードを書くには最適ですね。
ということで今回は簡単なSalesforceとAmazonRDS連携のコードを書いてみます。
今回やること
AmazonRDS上のMySQLから取得したデータをSalesforce上で表示してみたいと思います。
- AmazonRDS上のDBとしてMySQLを利用する。
- AmazonRDSとSalesforceの接続にAmazonEC2を利用する。
- AmazonEC2で作成するサービスはGo言語を利用する。
- Salesforce側の画面ではLightningを利用する。
下の図のようなイメージです。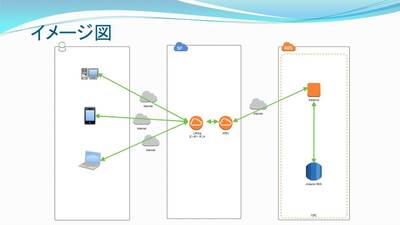
事前準備
- Developer Edition組織の登録
- AmazonEC2の用意
- Salesforceからのアクセスを行えるようセキュリティグループの設定を行う。
- 開発用の端末からアクセスを行えるようセキュリティグループの設定を行う。(必要であれば)
- Goのインストールを行う。
- Go開発用のパスを設定する。
- 今回の開発に必要なMySQLのドライバをインストールする。
- MySQL Clientをインストールする。
- AmazonRDSの用意
- EC2からアクセスを行えるようにセキュリティグループの設定を行う。
- MySQLのDB インスタンスを作成する。
※詳細な設定内容と開発端末のクライアントソフトは今回の記事では省略します。
開発
開発として下記の内容を作成しました。
- MySQLのテーブル設定とサンプルデータの登録
- AmazonEC2でのWebAPIの開発
- Salesforce側の呼出画面
テーブルの作成とデータ登録
EC2にSSHでログインした後、RDS上のMySQLインスタンスへ接続します。
mysql --show-warnings -h [書き込みエンドポイント] -P [ポート] -u [ユーザ名] -p[パスワード]
続いて、次のコマンドで使用するDB名を指定します。
use [DB名];
次にテーブル作成をします。
CREATE TABLE [DB名].imageinformation
(id varchar(20),
name varchar(200),
size varchar(20),
lastModifiedDate DATE)ENGINE=InnoDB DEFAULT CHARSET=utf8;
最後にサンプルデータの登録をします。
insert into imageinformation values('0001', '妙高山', '2454', cast('2016-10-04' as date));
insert into imageinformation values('0002', '那智山', '756', cast('2016-10-05' as date));
insert into imageinformation values('0003', '金時山', '1212', cast('2016-10-07' as date));
insert into imageinformation values('0004', '羽黒山', '414', cast('2016-10-09' as date));
insert into imageinformation values('0005', '大江山', '832', cast('2016-10-11' as date));
insert into imageinformation values('0006', '鳥海山', '2236', cast('2016-10-11' as date));
insert into imageinformation values('0007', '月山', '1984', cast('2016-10-12' as date));
insert into imageinformation values('0008', '九鬼山', '970', cast('2016-10-15' as date));
insert into imageinformation values('0009', '冷水山', '546', cast('2016-10-16' as date));
insert into imageinformation values('0010', '古処山', '859', cast('2016-10-16' as date));
MySQLで行う作業は以上です。
WebAPIの作成
次にEC2側にSalesforceとRDSを繋ぐWebAPIを用意します。
Goのコードは以下のように記載しています。
Goのコード
package main
import (
"fmt"
"log"
"net/http"
"database/sql"
"encoding/json"
"github.com/julienschmidt/httprouter"
_ "github.com/go-sql-driver/mysql"
)
type ImageInformation struct {
Id                  string  `json:"id"`
Name                string  `json:"name"`
Size                string  `json:"size"`
LastModifiedDate    string  `json:"lastModifiedDate"`
}
type TemplateJson struct {
Status              string  `json:"status"`
Msg                 string  `json:"msg"`
ImageInformations   []ImageInformation  `json:"s3DTOList"`
}
func ResponseJson(w http.ResponseWriter, r *http.Request, _ httprouter.Params) {
w.WriteHeader(500)
w.Header().Set("Content-Type", "application/json; charset=UTF-8")
var rj TemplateJson
db, err := sql.Open("mysql", "[ユーザ名]:[パスワード]@tcp([書き込みエンドポイント]:[ポート])/[DB名]")
if err != nil {
panic(err.Error())
}
defer db.Close()
rows, err := db.Query("select * from imageinformation")
if err != nil {
panic(err.Error())
}
columns, err := rows.Columns()
if err != nil {
panic(err.Error())
}
values := make([]sql.RawBytes, len(columns))
scanArgs := make([]interface{}, len(values))
for i := range values {
scanArgs[i] = &values[i]
}
var InfId string
var InfName string
var InfSize string
var InfLastModifiedDate string
for rows.Next() {
err = rows.Scan(scanArgs...)
if err != nil {
panic(err.Error())
}
for i, col := range values {
if col == nil {
switch i {
case 0:
InfId = "NULL"
case 1:
InfName = "NULL"
case 2:
InfSize = "NULL"
case 3:
InfLastModifiedDate = "NULL"
}
} else {
switch i {
case 0:
InfId = string(col)
case 1:
InfName = string(col)
case 2:
InfSize = string(col)
case 3:
InfLastModifiedDate = string(col)
}
}
}
fmt.Println(rj.ImageInformations)//動作確認用
rj.ImageInformations = append(rj.ImageInformations, ImageInformation{Id: InfId, Name: InfName, Size: InfSize, LastModifiedDate: InfLastModifiedDate})
}
rj.Status = "OK"
rj.Msg = "テストメッセージ"
b, err := json.Marshal(rj)
if err != nil {
fmt.Println("json err:", err)
}
fmt.Println(string(b))//動作確認用
json.NewEncoder(w).Encode(rj)
}
func main() {
router := httprouter.New()
router.GET("/:path", ResponseJson)
log.Fatal(http.ListenAndServe(":8080", router))
}
Goを使うのは今回が初めてでしたが、思ったより簡単に動くものが出来ました。
中身としては
- Webサービス実行
func main() {
router := httprouter.New()
router.GET("/:path", ResponseJson)
log.Fatal(http.ListenAndServe(":8080", router))
}
- MySQLへの接続
db, err := sql.Open("mysql", "[ユーザ名]:[パスワード]@tcp([書き込みエンドポイント]:[ポート])/[DB名]")
- JSON形式でのレスポンス
type ImageInformation struct {
Id                  string  `json:"id"`
Name                string  `json:"name"`
Size                string  `json:"size"`
LastModifiedDate    string  `json:"lastModifiedDate"`
}
type TemplateJson struct {
Status              string  `json:"status"`
Msg                 string  `json:"msg"`
ImageInformations   []ImageInformation  `json:"s3DTOList"`
}
JSON用の構造体の定義です、ここでJSONに変換した際のキーも指定しています。
b, err := json.Marshal(rj)
if err != nil {
fmt.Println("json err:", err)
}
fmt.Println(string(b))//動作確認用
json.NewEncoder(w).Encode(rj)
この部分でJSONに変換してレスポンス用のJSONを返しています。
直接呼び出すとこのように表示されます。

Salesforce画面の作成
Salesforce側はLightningで作成しています。
こちら側ではAmazonEC2に対してリクエストを投げて、返ってきたJSONを表示します。
Lightning コンポーネントとして4つのファイルを作成します。
コードは開発者コンソールで記述します。
ファイル名:S3DataSearch.app
<aura:application >
<div class="slds" style="margin-top:10px; margin-left:10px;">
<ltng:require styles="/resource/SLDS090/assets/styles/salesforce-lightning-design-system-ltng.css" />
<c:S3DataView />
</div>
</aura:application>
ファイル名:S3DataView.cmp
<aura:component controller="S3DataViewController">
<aura:attribute name="S3DTOList" type="S3DataViewController.S3DTO[]" />
<aura:if isTrue="{!!empty(v.msg)}">
<ui:message title="Error" severity="error" closable="false">
{!v.msg}
</ui:message>
</aura:if>
<article class="slds-card">
<div class="slds-card__header slds-grid">
<ui:outputText value="Search Condition"/>
</div>
<div class="slds-card__body">
<div style="float: left; padding-left: 10px;">
<div>
<ui:outputText value="name"/>
</div>
<div>
<ui:inputText aura:id="name" class="field" />
</div>
</div>
<div style="float: left; padding-left: 10px;">
<div>
<ui:outputText value="date(from)" />
</div>
<div>
<ui:inputDate aura:id="fromDate" displayDatePicker="true" />
</div>
</div>
<div style="float: left;">
<div>
<ui:outputText value="date(to)" />
</div>
<div>
<ui:inputDate aura:id="toDate" displayDatePicker="true" />
</div>
</div>
<br style="clear: both;" />
</div>
</article>
<ui:button label="Search" press="{!c.doSearchFunc}" />
<table class="slds-table slds-table--bordered slds-table--cell-buffer">
<thead>
<tr class="slds-text-title--caps">
<th scope="col">
<div class="slds-truncate" title="ID">ID</div>
</th>
<th scope="col">
<div class="slds-truncate" title="Name">Name</div>
</th>
<th scope="col">
<div class="slds-truncate" title="Size">Size</div>
</th>
<th scope="col">
<div class="slds-truncate" title="Last Modified Date">Last Modified Date</div>
</th>
</tr>
</thead>
<tbody>
<aura:iteration items="{!v.S3DTOList}" var="S3DTO">
<tr>
<td>{!S3DTO.id}</td>
<td>{!S3DTO.name}</td>
<td>{!S3DTO.size}</td>
<td>{!S3DTO.lastModifiedDate}</td>
</tr>
</aura:iteration>
</tbody>
</table>
</aura:component>
ファイル名:S3DataViewController.js
({
doSearchFunc : function(component, event, helper) {
var name = component.find("name").get("v.value");
var fromDate = component.find("fromDate").get("v.value");
var toDate = component.find("toDate").get("v.value");
helper.doSearchHelper(component, name, fromDate, toDate);
}
})
ファイル名:S3DataViewHelper.js
({
doSearchHelper : function(component, name, fromDate, toDate) {
var action = component.get("c.doSearch");
action.setParams({ "name" : name,
"fromDate" : fromDate,
"toDate" : toDate
});
action.setCallback(this, function(actionResult) {
var state = actionResult.getState();
if (state === "SUCCESS") {
if (actionResult.getReturnValue().status === "OK") {
component.set("v.S3DTOList", actionResult.getReturnValue().s3DTOList);
} else if (actionResult.getReturnValue().status === "NG") {
component.set("v.msg", actionResult.getReturnValue().msg);
}
} else if (state === "ERROR") {
var errors = actionResult.getError();
if (errors) {
if (errors[0] && errors[0].message) {
component.set("v.msg", errors[0].message);
}
} else {
component.set("v.msg", "An unexpected error has occurred.");
}
}
});
$A.enqueueAction(action);
}
})
Apexクラスとして以下のコードを作成します。
※エンドポイントの部分はリモートサイト設定で登録しておく必要があります。
ファイル名:S3DataViewController
/**
* S3DataViewController.
* @since 2016/09/21
*/
public class S3DataViewController {
@AuraEnabled
public static ResDTO doSearch(String name, String fromDate, String toDate) {
Map<String, String> paramMap = new Map<String, String>{
'name' => name,
'fromDate' => fromDate,
'toDate' => toDate};
HttpRequest req = new HttpRequest();
req.setMethod('GET');
req.setTimeout(60000);
req.setHeader('Connection', 'keep-alive');
req.setEndpoint('[エンドポイント:ポート]/index');
Http http = new Http();
try {
HTTPResponse res = http.send(req);
System.debug('***' + res.getBody());
ResDTO resDTO = (ResDTO) JSON.deserialize(res.getBody(), S3DataViewController.ResDTO.class);
System.debug('***' + resDTO);
return resDTO;
} catch (System.CalloutException e) {
System.debug(e);
throw new AuraHandledException('An api connected error has occurred.');
} catch (Exception e) {
System.debug(e);
throw new AuraHandledException('An unexpected error has occurred.');
}
}
public class ResDTO {
@AuraEnabled
public String status {get; set;}
@AuraEnabled
public String msg {get; set;}
@AuraEnabled
public List<S3DTO> s3DTOList {get; set;}
public ResDTO(String status, String msg, List<S3DTO> s3DTOList) {
this.status = status;
this.msg = msg;
this.s3DTOList = s3DTOList.clone();
}
}
public class S3DTO {
@AuraEnabled
public String id {get; set;}
@AuraEnabled
public String name {get; set;}
@AuraEnabled
public String size {get; set;}
@AuraEnabled
public String lastModifiedDate {get; set;}
public S3DTO(String id, String name, String size, String lastModifiedDate) {
this.id = id;
this.name = name;
this.size = size;
this.lastModifiedDate = lastModifiedDate;
}
}
}
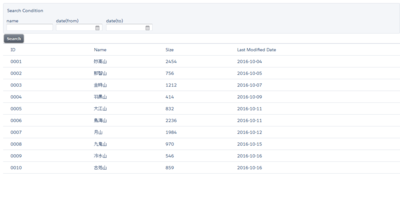
表示される画面は以下のようになります。
後書き
今回はサンプルプログラムとして作成したのでデータの取得のみでしたが、Goはなかなか面白い言語なので今後も使ってみようと思います。
SalesforceとAmazonRDSを接続する方法は、Go言語以外でも可能ですし外部の連携ツールを利用することでも可能ですので目的に合った物を使用しましょう。
AmazonRDSを使用した既存システムや旧システムのデータ参照などでSalesforceとの連携が必要な際に、今回の記事が何かの参考になれば幸いです。